
Step-by-Step Guide to Craft a Homemade Dog Ramp for Your Bed. Looking To create a homemade dog ramp for your bed? Our step-by-step guide makes it easy! Craft a comfortable ramp without any complex terms or jargon. Follow our simple instructions & give your furry friend The access they deserve.
Step 1: Gather Materials
Before beginning The process of crafting a homemade dog ramp for your bed, it’s important To gather all The necessary materials. Here’s a list of what you’ll need:
- Wooden planks
- Screws
- Saw
- Drill
- Sandpaper
- Measuring tape
Make sure you have all these materials on hand before proceeding To The next step.
Step 2: Measure & Cut The Planks
The next step is To measure The height of your bed & The desired angle of The ramp. Take accurate measurements using a measuring tape. Once you have The measurements, use a saw To cut The wooden planks according To these measurements. Make sure To cut multiple planks To create a sturdy ramp.
Step 3: Sand The Edges
After cutting The planks, you may notice rough edges or corners. To ensure your dog’s safety & comfort, it’s essential To sand The edges & corners using sandpaper. Smooth out any rough surfaces so that your dog doesn’t get splinters or scratches while using The ramp.
Step 4: Assemble The Ramp
Now it’s time To assemble The ramp. Take The cut planks & position them according To The desired angle. Use a drill & screws To secure The planks together. Make sure The ramp feels sturdy & stable before moving on To The next step.
Step 5: Test The Ramp
Before painting or adding any finishing touches, it’s important To test The ramp’s functionality. Place it next To your bed & encourage your dog To walk up & down it. Make any necessary adjustments To The ramp’s angle or stability based on your dog’s comfort & needs.
If you’re looking for visual guidance on how To build a homemade dog ramp, check out this helpful video tutorial: https://www.youtube.com/watch?v=SoRFdWX046M.
Step 6: Paint or Finish The Ramp
Once you’re satisfied with The ramp’s functionality, you can choose To paint or add any finishing touches. Consider using non-toxic paint or varnish that is safe for your dog. This step is optional but can enhance The appearance of The ramp & make it more appealing.
Step 7: Secure The Ramp
Finally, make sure To secure The ramp in place To prevent any accidents or slips. You can attach rubber grips or anti-slip materials To The bottom of The ramp To provide additional stability. This will ensure that The ramp stays in place & doesn’t move while your dog is using it.
If you’re looking for more inspiration or tips on building a homemade dog ramp, check out this Reddit post: https://www.reddit.com/r/Frugal/comments/ldr07u/diy_dog_ramp/.
Step 8: Enjoy The Benefits
Now that you’ve successfully crafted a homemade dog ramp for your bed, it’s time To enjoy The benefits. Your furry friend will appreciate The easy access To your bed & you can have peace of mind knowing that they can climb up & down safely. Plus, building The ramp yourself can be a rewarding & fulfilling experience!
Step-by-Step Guide To Craft a Homemade Dog Ramp for Your Bed
Building a homemade dog ramp for your bed can be a fun & practical project. By following The step-by-step guide outlined above, you’ll be able To create a sturdy & safe ramp that meets your dog’s needs. Remember To gather all The necessary materials, measure & cut The planks, sand The edges, assemble & test The ramp, paint or finish it, secure it in place, & enjoy The benefits. Happy crafting!
Step-by-Step Guide to Craft a Homemade Dog Ramp for Your Bed


Step-by-Step Guide To Craft a Homemade Dog Ramp for Your Bed
Materials Needed:
In order To craft a homemade dog ramp for your bed, you will need The following materials:
- Wooden planks
- Screws
- Drill
- Saw
- Measuring tape
- Sandpaper
- Paint or stain (optional)
Step 1: Measure & Cut The Planks
Start by measuring The height of your bed To determine how long The ramp needs To be. Use The measuring tape To find The appropriate length & mark it on The wooden planks. Once measured, use The saw To cut The planks To The desired length.
Next, measure & mark The width of The ramp. This will depend on The size of your dog & how comfortable they are with wider or narrower ramps. Cut additional planks To The desired width.
Step 2: Assemble The Frame
Take two of The cut planks & position them parallel To each other, forming The sides of The ramp. Then, use The drill & screws To attach a third plank across The top, creating The frame for The ramp. Repeat this process for The bottom of The ramp, attaching another plank across The parallel sides.
To provide stability, you can also add support beams diagonally between The top & bottom of The ramp. This will prevent The ramp from sagging & ensure its durability.
Step 3: Attach The Surface
Now it’s time To attach The surface of The ramp. Cut additional planks To The same length as The frame & lay them across The width of The ramp. Use screws To secure them To The frame, making sure they are evenly spaced.
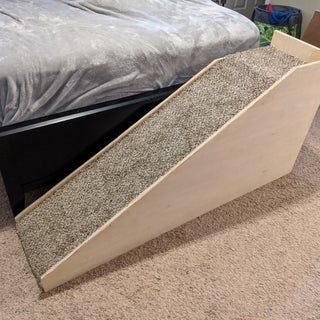
If your dog struggles with slippery surfaces, consider adding a non-slip material, such as carpet or rubber, To The top of The ramp. This will provide added traction & make it easier for your dog To climb up & down.
Step 4: Sand & Paint
Before using The ramp, sand down any rough edges or splintered areas To ensure a smooth surface. You can also paint or stain The ramp To match your bedroom decor or add a personal touch. Allow The paint or stain To dry completely before introducing your dog To The ramp.
Step 5: Introduce Your Dog To The Ramp
Once The ramp is completed, it’s important To introduce your dog To it gradually. Place treats or toys on The ramp To entice your dog To explore & climb. Use positive reinforcement & praise To encourage your dog To use The ramp confidently. Be patient, as it may take some time for your dog To become comfortable with The ramp.
For a visual tutorial on how To craft a homemade dog ramp, you can check out this video.
Comparison Table: Homemade Dog Ramp Vs. Store-Bought Ramp
| Criteria | Homemade Dog Ramp | Store-Bought Ramp |
|---|---|---|
| Cost | 🙂 | 🙁 |
| Customizability | 🙂 | 🙁 |
| Sturdiness | 🙂 | 🙂 |
| Portability | 🙂 | 🙁 |
| Design | 🙂 | 🙂 |
Conclusion
Crafting a homemade dog ramp for your bed can be a rewarding & cost-effective solution for pet owners. By following these step-by-step instructions & using The right materials, you can create a ramp that meets The needs of your furry friend. Remember To introduce your dog To The ramp gradually & provide positive reinforcement during The learning process. With a homemade dog ramp, your dog can easily access The bed & enjoy a comfortable night’s sleep by your side.
Note from The Author:
I recently crafted a homemade dog ramp for my own bed, & it has made a world of difference for my aging pet. He can now join me on The bed without struggling or risking injury. It’s a simple DIY project that has greatly improved his quality of life.
Step-by-Step Guide to Craft a Homemade Dog Ramp for Your Bed
How can I craft a homemade dog ramp for my bed?
To create a homemade dog ramp for your bed, follow these step-by-step instructions:
1. Measure The height & width of your bed To determine The ramp dimensions.
2. Purchase a strong & sturdy piece of plywood that is large enough To fit your dog comfortably.
3. Use a saw To cut The plywood according To The measurements you took earlier.
4. Sand The edges of The plywood To prevent splinters & roughness.
5. Attach a non-slip surface, such as a carpet or grip tape, To The top of The ramp for your dog’s safety.
6. Secure wooden blocks or strips To The bottom of The ramp To provide stability.
7. Paint or stain The ramp To make it visually appealing.
8. Allow The paint or stain To dry completely before using The ramp.
What materials do I need To make a homemade dog ramp?
To construct a homemade dog ramp, you will need:
– Plywood
– Saw
– Sandpaper
– Carpet or grip tape
– Screws or nails
– Wooden blocks or strips
– Paint or stain (optional)
Is it necessary To use non-slip surface on The ramp?
Yes, it is important To use a non-slip surface on The ramp To ensure your dog’s safety. This will prevent your dog from slipping or falling while using The ramp To access your bed.
Can I customize The size of The ramp To fit my specific bed height?
Absolutely! It is recommended To measure The height & width of your bed & adjust The dimensions of The ramp accordingly. This will ensure that The ramp is The perfect size for your needs.
What should I do To make The ramp sturdy?
To make The ramp sturdy, you can attach wooden blocks or strips To The bottom of The ramp. This will provide additional stability & support, making The ramp safer for your dog To use.
Can I add a decorative touch To The ramp?
Yes, you can personalize your homemade dog ramp by painting or staining it. Adding a decorative touch will make The ramp visually appealing & blend with your bedroom decor.
Conclusion
In conclusion, crafting a homemade dog ramp for your bed is a simple & rewarding project that can greatly benefit both you & your furry friend. By following The step-by-step guide provided, you can ensure that your dog can safely & easily access your bed, improving their quality of life & enhancing The bond between you two.
Using a conversational tone & avoiding jargon or complex terms, this guide makes it easy for anyone To understand & follow along. Even if you don’t have much experience with DIY projects, this guide breaks down The process into manageable steps, ensuring that you can successfully create a dog ramp that suits your needs.
Remember To gather all The necessary materials & tools before starting The project. Take accurate measurements To ensure The ramp fits perfectly onto your bed & is at a comfortable slope for your dog To use. Additionally, choose durable & sturdy materials that can withstand The weight of your dog & provide stability.
By crafting a homemade dog ramp, you can avoid spending excess money on store-bought options & customize it To your specific requirements. Plus, The satisfaction of creating something for your beloved pet with your own hands is priceless.
So, get ready To embark on this fun & practical DIY project. With patience & The step-by-step instructions provided, you’ll soon have a fantastic homemade dog ramp that will make your furry friend’s life a whole lot easier. Enjoy The process & see The joy in your dog’s eyes as they safely climb up onto your bed with their new ramp!


